Watch Bench
It’s another post from the watch bench, continuing on with the Lord Elgin watch. In the last post about this watch I disassembled it and put a new mainspring in the barrel, and you can see that post here.
 This is the plate that most everything else in the watch movement attaches to. It has gone through the ultrasonic cleaner a couple times and a quick look at the jewels show they all look good, meaning there aren’t any cracks or jagged edges in the holes to damage any pivots that will be running in them. The next step is to put the gears (gear train) into the watch without breaking anything. This is a bit of a challenge for me still since it involves putting 4 small gears and a toggle into those jewels with steel pivots about the thickness of a human hair. Once you have them kind of aligned, you have to put a ‘bridge’ or support for the top of the gears in place aligning all the tiny pivots into the bridge.
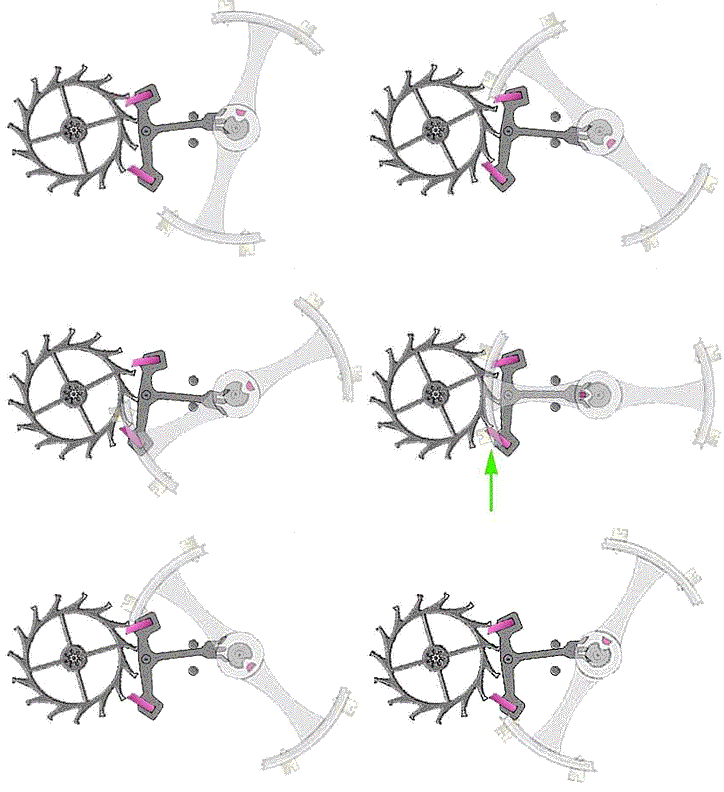
In the animation above (if I remembered where I got this from I would note it here, but I don’t) you can see how the balance swings back and forth toggling the pallet with its two jewel fingers allowing the escape wheel to release one tooth at a time. I will be installing the jeweled pallet and escape wheel first.
Time to give it a shot.
Do you see the piece that was added in the picture above? If not, I dont blame you the part is about 3mm long and just under 3mm wide. Here is the same pic with the pallet and fork highlighted.

The pallet has it’s own cock to hold it in place, so that goes on next. It’s crucial to make sure that the top pinion on the pallet seats securely in the pallet cock and that the pallet swings freely from side to side against the banking pins.
The shiny plate with a jewel over the pallet is the pallet cock. It is in place, secured down, and the pallet swings freely. To make sure I installed it correctly I place the escape wheel in it’s spot and do a quick inspection of the pallet jewel clearances.
Now for the rest of the gears.
First off to get installed is the center wheel, which is what the minute hand attaches to, and turns one complete revolution every minute if all is installed correctly.
With the pinion from the center wheel protruding out of the other side I need to use a movement holder so I dont do damage to the shaft. Then I can install the third wheel next to, and under, the center wheel.
And finally the fourth wheel is installed connecting the escape wheel to the rest of the gear train. So far, so good, but next is the tricky part. Now I have to install the bridge on top of these gears and get the pinions you can see on the top of each gear lined up in its jewel hole.
There it is. Gear train and bridge is installed. I use a slight pressure from my tweezers to shift the center wheel back and forth to make sure the gears all move freely and nothing is binding.
As a side note, while I worked on this part of the watch I realized I am completely out of my home made raspberry mead. This is completely unacceptable and the next post will probably be this weekend with details of how to make your own raspberry mead. Raspberry mead… watches…. now all I need is a spirited red-headed woman for company….. lmao!


